


I love bagels. They are probably my favorite non-sandwich bread. I have been using this homemade bagel recipe for years - especially since we moved to Montana and found ourselves so far away from well, everything. Living in the middle of nowhere, if I want a bagel I have to bake bagels unless I buy those frozen things that pass as bagels. So bake I do.
As usual when it comes to baking breads, I turn to my favorite cookbook for the bagel recipe I use - (affiliate link) Secrets of a Jewish Baker - as it has never failed me. I love, love, love this cookbook for bread. As I have mentioned before, I am now on my second copy as I totally destroyed my first one.
This recipe is in regular rotation around here and I have learned that the finished bagels freeze very well. After they have cooled, I just put them in bags and when I want one I pull it out and it thaws pretty quickly. I am updating this post from several years ago because I think we are all baking more these days.
Any purchase links are affiliate links which means if you buy anything through them I will receive a small commission (at no additional charge to you)

Homemade Bagels
Makes 12 - 18 depending on what size you want your bagels (I have even made mini bagels!)
2 cups warm water
1 heaping tsp active dry yeast
3 TBSP Barley Malt Syrup* divided
1 TBS olive oil
6 - 8 cups bread flour
1 TBS salt
* Barley Malt Syrup gives bagels their distinctive taste and gloss and is added to the boiling water as well as to the dough. If you don’t have it or can’t find it (it’s readily available in natural food stores or online) you can substitute brown sugar but the flavor will be sweeter.
- Add the yeast to the warm water to your mixer and let it stand for a few minutes to get foamy.
- Add in 2 TBS of the Barley Malt Syrup (or sugar if using sugar). I will warn you that Barley Malt Syrup is THE STICKIEST substance I have ever worked with. It is stickier than honey, corn syrup and maple syrup combined. Just know this. And be prepared. I have learned through experience to stir the malt syrup into the water/yeast mixture or it just sits in the bottom.
- Add in 6 cups of flour, the oil and the salt. With the paddle on the mixer stir until the dough comes together.
- If it is still sticky add in another cup to two cups of flour. This will depend on the humidity levels where you live. You need a stiff but workable dough. I end up using 7 cups of flour.
- Put the dough hook on and knead the dough for 12 - 15 minutes until it is smooth and elastic.
- Place the dough in an oiled bowl and set it aside to rise for 1 - 1 1/2 hours. (In the summer my dough is ready in 1 hour in the winter it needs the extra time. You will know it is ready when you poke your finger in it and the indentation remains.)
- Preheat the oven to 500°
- Take a large (6 qt) pot, add the remaining 1 TBS Barley Malt Syrup (or sugar) and fill with water and set to boiling.
- When it reaches a boil, reduce the heat so it is just simmering.

- Take your risen dough from its bowl (or bowls in my case.)

- And on a lightly floured surface press the dough into a rectangle.
- Cut the rectangle into slices and cut the slices into 12 - 18 pieces. (I know - you see no flour. My counters lets me work without flour.)
- Now you roll the bagels. Mine are never perfect. I don’t really care. Check out the video for how to roll the bagels
- There is a second method for shaping the bagels that has resulted in better looking bagels, at least for me. You can see the full directions HERE but I’ve provided a short video on how it’s done:
- Have two heavy duty baking sheets ready; I line mine with silicone mats. If you don’t have silicone mats make sure they are well greased or line with parchment.
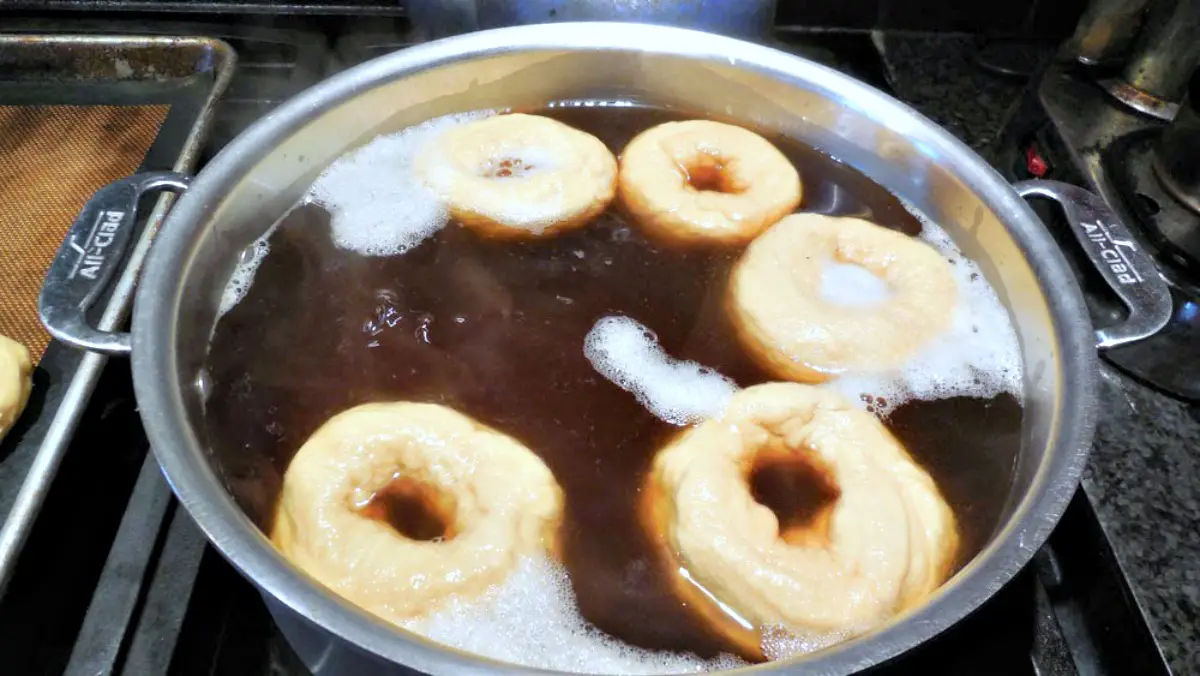
- Place the shaped bagels on the prepared pans and move them over to the simmering water.
- Four or five at a time drop them in the water and simmer for 1 minute on each side.
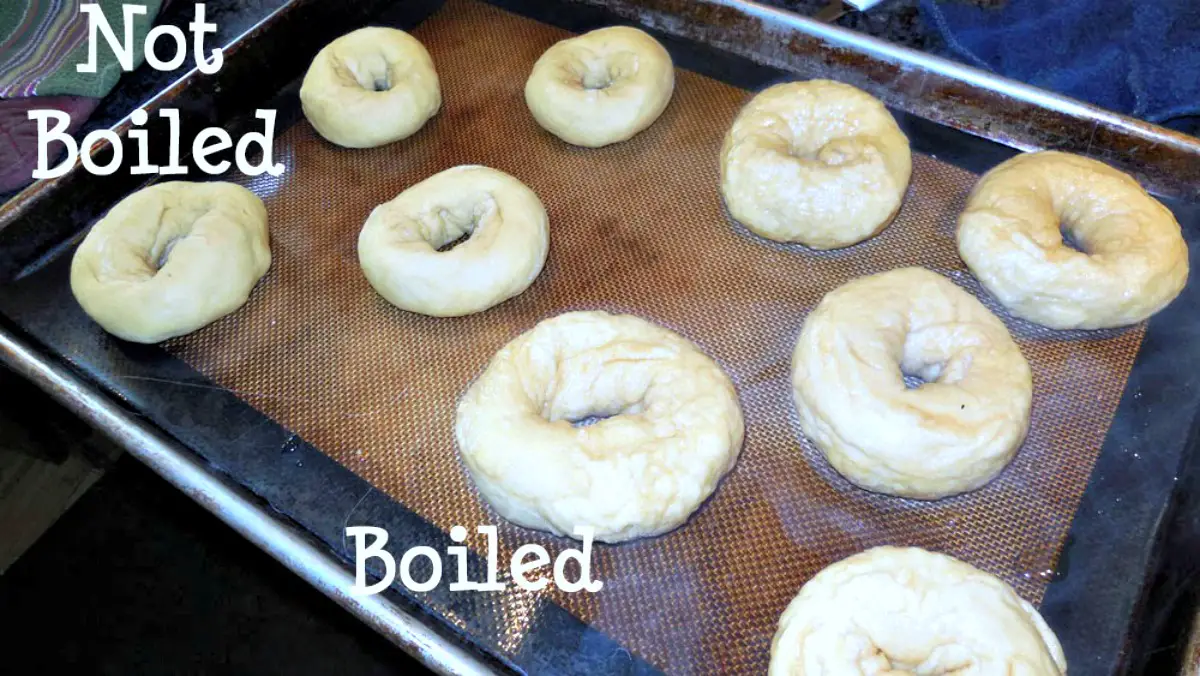
- Return them to the baking pan to rest while you boil the others. You can see the difference the boiling makes.
- If you are going to add toppings like course salt or everything bagel topping this is the time to sprinkle it on
- Bake at 500° for 7 1/2 minutes and then rotate the trays.
- Bake for another 7 1/2 to 8 minutes until the bagels are golden brown.
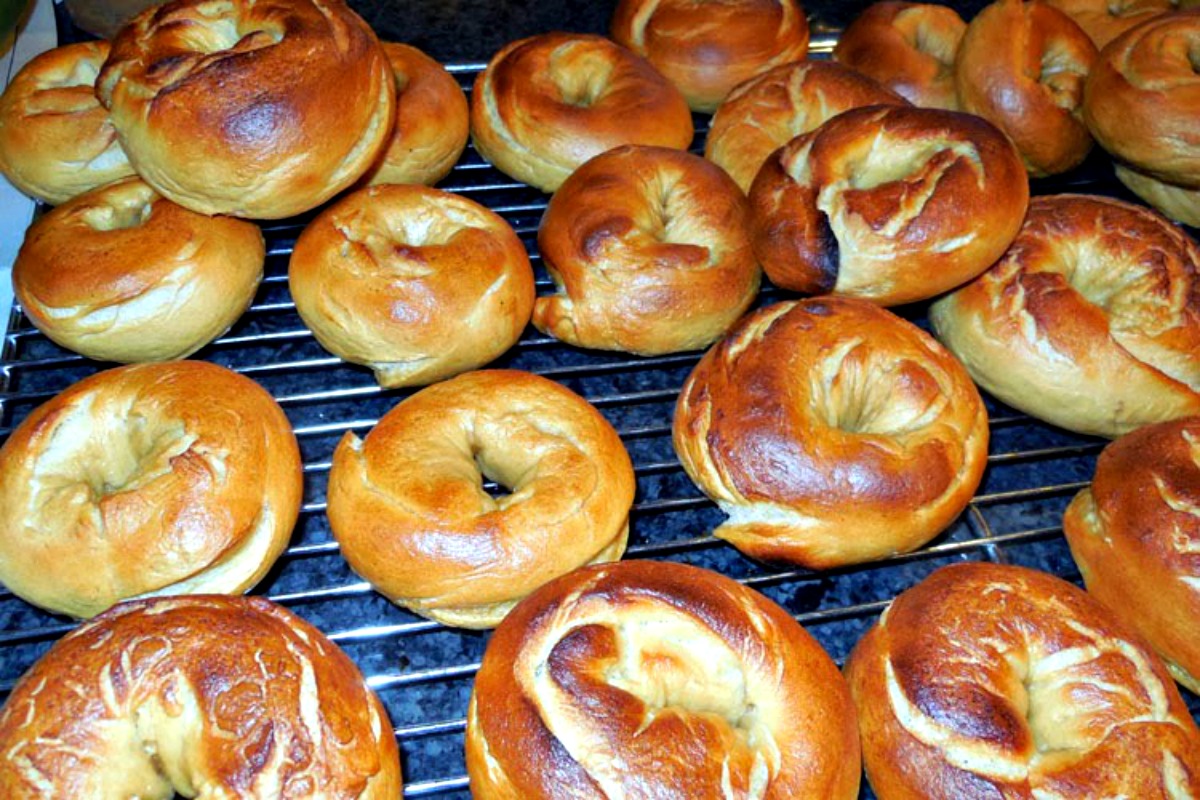
- Remove to a cooling rack.
How Are the Homemade Bagels?
Since I am blessed with three KitchenAid mixers I often make two batches using my commercial and my pro models - I figure if I’m gonna bake I might as well BAKE. My Artisan is 40 years old now and while I suspect it could handle this dough I don’t have to make it work that hard so I don’t.
That machine has been a workhorse for me since it was given to me as a shower present so I like to give her a break when I can since I do have the others.
The recipe indicates that it will make 12 bagels but by that standard they are HUGE. I make 18 with each batch and they are a more reasonable size.

These are tasty bagels. To me they are almost as good as what I could get in a bakery at home. When I bake them I do make a double batch - but using two mixers. The dough is much too stiff to double up in one mixer.
As I mentioned above they freeze beautifully. When I make them I end up with 36 so I package them 12 to a bag. They taste like they are fresh from the oven after they thaw. By doing one big baking day every two weeks or so I have plenty to last. I really enjoy one for lunch with some of my homemade jam and cream cheese.
I alternate my bagel baking with English Muffin Bread and Challah. Erm, I like bread. Can you tell?
Print
Homemade Bagels - Recipe
- Prep Time: 2 hours
- Cook Time: 45 minutes
- Total Time: 2 hours 45 minutes
- Yield: 12 - 24 1x
- Category: Bread
- Method: boil and bake
- Cuisine: Polish/Jewish
Description
homemade bagels that taste almost as good as those from a bakery
Ingredients
- 2 cups warm water
- 1 heaping tsp active dry yeast
- 3 TBSP Barley Malt Syrup* divided
- 1 TBS olive oil
- 6 – 8 cups bread flour
- 1 TBS salt
Toppings like sea salt or everything bagel if desired
Instructions
- Add the yeast to the warm water to your mixer and let it stand for a few minutes to get foamy.
- Add in 2 TBS of the Barley Malt Syrup (or sugar if using sugar). I will warn you that Barley Malt Syrup is THE STICKIEST substance I have ever worked with. It is stickier than honey, corn syrup and maple syrup combined. Just know this. And be prepared. I have learned through experience to stir the malt syrup into the water/yeast mixture or it just sits in the bottom.
- Add in 6 cups of flour, the oil and the salt. With the paddle on the mixer stir until the dough comes together.
- If it is still sticky add in another cup to two cups of flour. This will depend on the humidity levels where you live. You need a stiff but workable dough. I end up using 7 cups of flour.
- Put the dough hook on and knead the dough for 12 – 15 minutes until it is smooth and elastic.
- Place the dough in an oiled bowl and set it aside to rise for 1 – 1 1/2 hours. (In the summer my dough is ready in 1 hour in the winter it needs the extra time. You will know it is ready when you poke your finger in it and the indentation remains.)
- Preheat the oven to 500°
- Take a large (6 qt) pot, add the remaining 1 TBS Barley Malt Syrup (or sugar) and fill with water and set to boiling.
- When it reaches a boil, reduce the heat so it is just simmering.
- Take your risen dough from its bowl (or bowls in my case.)
- And on a lightly floured surface press the dough into a rectangle.
- Cut the rectangle into slices and cut the slices into 12 – 18 pieces. (I know – you see no flour. My counters lets me work without flour.)
- Now you roll the bagels. Mine are never perfect. I don’t really care. Check out the video for how to roll the bagels
- Have two heavy duty baking sheets ready; I line mine with silicone mats. If you don’t have silicone mats make sure they are well greased or line with parchment.
- Place the shaped bagels on the prepared pans and move them over to the simmering water.
- Four or five at a time drop them in the water and simmer for 1 minute on each side.
- Return them to the baking pan to rest while you boil the others. You can see the difference the boiling makes.
- Bake at 500° for 7 1/2 minutes and then rotate the trays.
- Bake for another 7 1/2 to 8 minutes until the bagels are golden brown.
- Remove to a cooling rack.
Notes
Prep time includes rise time
You can also make up toppings to add to them if you want. If you do you just add the topping to the damp bagel after you have boiled it and before you put it in the oven. I am particularly fond of salt bagels. I just sprinkle coarse salt on top before baking. If you like you can sprinkle “everything bagel seasoning” for that bakery touch.
Keywords: bagel, bagels, salt bagel, homemade bagels
Internet highlights
- Casino En Ligne Fiable
- Migliori Casino Online
- Casino En Ligne Crypto
- Casino Online
- Meilleur Casino En Ligne Retrait Immédiat
- Casino En Ligne France
- Site Paris Sportif Belgique
- Bookmaker Italia
- Poker Online I Migliori Siti
- Migliori Casino Online Esteri
- Meilleur Site De Poker En Ligne
- Bookmaker Crypto
- Casino En Ligne France
- Paris Sportif Tennis Avis
- Site De Paris Sportif
- Site De Paris Sportif Ufc
- オンラインカジノ本人確認不要
- ブック メーカー オッズ
- 암호화폐 베팅사이트
- 10 лучших казино онлайн
- Casino Live
- Meilleur Casino En Ligne 2026
- Nouveau Casino En Ligne Pour Joueur Francais
- Migliore Casino Non Aams
- Siti Scommesse Non Aams
- Casino En Ligne 2026
- Meilleur Casino En Ligne
- Migliori Casino Senza Documenti
- Meilleur Casino En Ligne
- Site Casino En Ligne
- Crypto Casino
- Casino Online Senza Documenti
- Free Spin Senza Deposito
- Top 10 Casino En Ligne Belgique
- Casino En Ligne Français 2026
- Migliori Casino Online
- Nouveau Casino En Ligne
- Siti Casino Online
- Casino Non Aams
- Casino Online France
- オンラインカジノ ポーカー
- Casino En Ligne Fiable